

As we are now into the Grayling season proper and the fish are still spread all over the river (as soon as the frosts start to bite, Grayling will shoal up), I thought it would be a good time to do a deep dive into Grayling-specific leaders and techniques.
Right at the end of this email is a really special offer on our 'Euro Style' Specialist Nymphing line - for only £19.99 - we've cut down on the packaging and passed the savings on to you.
So for all of you Grayling addicts, grab a brew - it's a bit of a long one ...
Grayling Leader Manifesto
Welcome to our Grayling Leader Manifesto, where we aim to give you all the information you need to give you a jump start when targeting Grayling in rivers this season. Our manifesto starts with the basics of leader material choice and knots to use, then continues to the more detailed leader configurations required for fishing different types of rivers.
Leader Material Choice
Just like fly lines, leader material choice is a Manifesto in itself, here are a few pointers to get you started:
Tippet selection is a very personal choice, use whichever material you have confidence in, this is the weak point in any setup, confidence in knot strength is everything!
- Nylon/Copolymer: Generally more cost effective and slightly thicker than Fluorocarbon with a much better tolerance to imperfect knots. A favourite of the Grayling angler is Maxima Chameleon for its abrasion resistance and colour when fishing in Winter.
- Fluorocarbon: Denser than water so will sink easier and faster than nylon, great when covering very spooky fish on crystal clear water as it does not transmit any light through the length of the tippet.
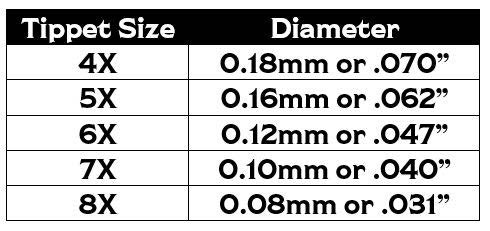
The X system marked on spools of tippet determines the diameter of the tippet (the bigger the X number, the thinner the tippet). When designing Grayling leaders, you generally do not need them to turn over, so it’s important to build in ‘weak points’ i.e. knots, for when you will inevitably get snagged on the riverbed and have to pull for a break!.
Knots
When building your own nymphing leaders, there are only two knots you need to be aware of:
The 3-Turn Water Knot
Use this knot for joining two pieces of tippet together, this is the knot you should use to join each section of your leader together. The best way to learn this knot is to follow an online tutorial: www.animatedknots.com, I’ve included the steps below:
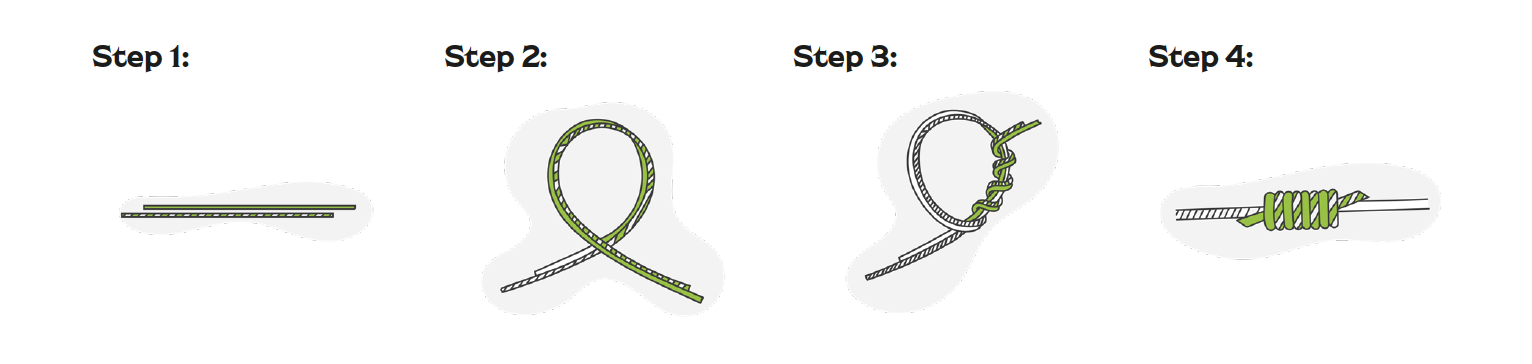
The Clinch Knot
The Clinch knot is a great knot for tying on nymphs to short droppers, as it can be tied with very little tippet. I use this knot to tie on all of my nymphs as it’s very secure and quick to tie. The best way to learn this knot is to follow an online tutorial: www.animatedknots.com, I’ve included the steps below:

Grayling Leader Designs
In this section we will give you some leader designs for different nymphing leaders for Grayling. Using all of the above information you can easily tie your own leaders, using the below images as a guide - happy tying:
Standard Nymphing Leader
This is the standard leader for nymphing in any type of water. It incorporates lighter tippet, both 6X and 7X - this builds a weak point at the knots where the dropper & flies are tied. With this leader being buit using a tapered leader, if the nymphs are light it can be cast, just as you would a dry fly:

Indicator Leader
The Indicator leader is used when fishing deeper water and heavier nymphs. The indicator used can take many different forms - the ‘putty’, ‘curly spring’ or wool style indicators are the most common - I tend to prefer the ‘putty’ style ones are the can be adjusted for both depth and to support the weight of your nymph:

Euro/Tight-Line Leader
This style of ‘Euro’ or Tight Line leader has a long sighter section of bi-coloured mono built in. This allows you to detect even the smallest of movements in the leader when the line is tight.
Top Tip: When building this style of leader is to leave the tag ends of your knots in the sighter section about an inch long - this stops the leader from falling back through the rod rings when the rod is held high!
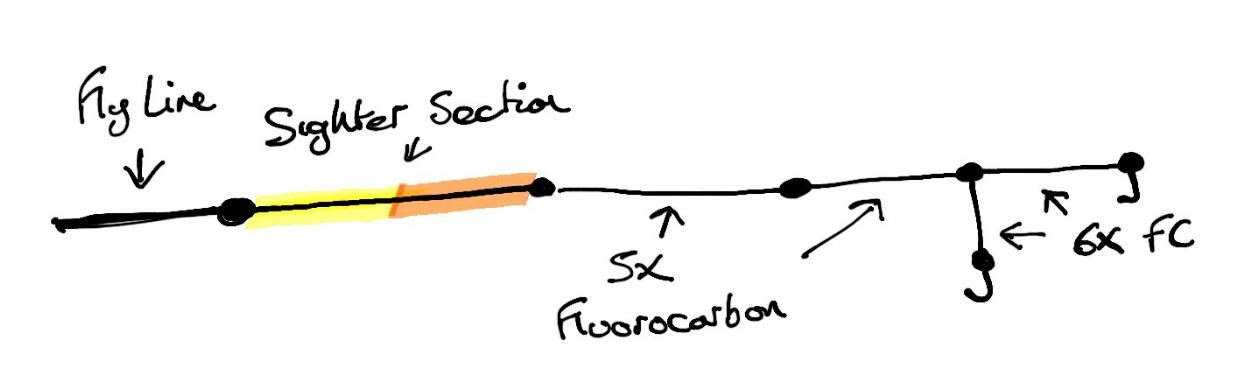
The 'P-Rig'
Those of you from a coarse or sea fishing background may notice the inspiration behind this novel nymphing setup - the Paternoster. This is a great rig to use when fishing on rivers where there are lots of rocks on the riverbed, as it presents the nymph just above the riverbed and the shot on the bottom can be adjusted for flow - it also can be sacrificial when you get snagged.

It can be quite tricky to tie the dropper to the Hends Roller, so I tie on the dropper to the roller before I build the whole rig (Top Tip - slip the roller over a pin and tie on the dropper, this keeps it from slipping out of your hands). I tie these rigs up at home before venturing out and then store them on a rig keeper.
The Dual Nymph Rig
The Dual-Nymph rig is exactly the same as fishing a single nymph, but you tie in a dropper around 12” to 18” above the point fly.
- From your indicator tie a length of tippet roughly equivalent to the depth of the water you will be fishing.
- To this add a short section (about 12" long) tied with a 3-turn water knot, use this to create a 6" dropper (shorter droppers don't tangle as much).
- To the point, tie in one of your heavier nymphs, and to the dropper use a lighter nymph. Cast/Lob the flies upstream and track them back to you, keeping the rod tip just ahead of the flies.
- Stop the rod tip just in front of you and let the flies drift downstream, feeling for takes all the time.
You can also use the Dual Nymph rig to present a small nymph near the bottom of the river. To do this, tie the heavier (sacrificial) nymph to the dropper and then tier your small (lighter) nymph to the point.
Casting A Nymphing Rig
I always find it very difficult to detect takes when fishing a single nymph at longer ranges (which is why I seldom do it), but I always fish a single nymph at short range using a tight-line method. To fish this you need to use the downstream water load cast, it’s an easy way to send your flies back upstream for another drift without making a back cast.
- Cast your rig out as normal
- At the end of the run, let your nymph drift all the way past you so it hangs in the current (and the fly line and leader tensions up)
- In one smooth motion, lift your rod up and use the built-in tension to flip your nymph back upstream
This simple cast is really efficient (especially in competitions) and ideally suited for short-line nymphing techniques. With the downstream water load, your flies spend more time in the water.
Tight Lines
Tight-line nymphing is one of the best methods for Grayling. Here’s how it’s done:
- Cast your nymph upstream; then
- As the nymph comes back towards you keeping the rod tip just ahead of the nymph, lead it back towards you keeping the line tight (this where you will detect your takes either by feel or by watching your in-line indicator for any abnormal movement).
- Stop the rod tip just in front of you and let the flies drift downstream, feeling for takes all the time.
- As the nymph drifts past you and downstream, it will start to rise in the water column, this is where lots of Grayling will be caught (known as the induced take).
- Then use the downstream water load cast to make your next cast and repeat the process.
Nymphing Methods
It’s important to note that when nymphing, you have to be quite methodical and logical when fishing the river. I’ve always found the best way to do it is to imagine the river is split up into a number of lanes (just like a motorway):

- Always fish the lane closest to you first from the bank before wading into the river (you’ll be amazed at how many fish you catch that you would have just waded through!).
- Once you have fished that lane, step into the river and fish the next lane out.
- Then repeat (assuming it’s safe to wade into the middle of the river).
- Once you have fished the width of the river as best you can, carefully wade back to your starting point and take a step up stream and repeat the whole process again.
It’s always better to cast into each lane quite a few times and let the nymph(s) do their work, generally though if there’s a fish around it will take the nymph within the first couple of drifts.

Playing A Grayling
When playing a grayling, keep the rod tip low, this keeps the fish deep (where they’re happy). Play the fish until it is upstream of you, then as the river brings the fish towards you, raise it in the water column and direct it into the net.
Once a Grayling is near the surface it will start to thrash about, this is where most fish are lost.
Please Note: If you like what you have read above and want to keep a copy, we've also made it available as a pdf copy - for you to print or distribute to your fishy friends, just click the button below to download your copy:
Thanks for reading this far ... now for a really special deal ...
When nymphing for any species, but especially Grayling, it always helps to have the best bite detection possible. We have developed our super-thin and sensitive nymphing lines to excel in all tight-line techniques (they even have a built-in indicator section).
As a part of our drive to reduce waste, we have now packaged these lines in eco-friendly material - cardboard - and can pass these savings on to you!

Our 'Euro Style' Nymphing Line is now available for only £19.99 - stunning value for a line of this type. Grab your specialist nymphing line now, and put the above tips into practice this Grayling season.
Want Something Already Made ...
RIO’s ready-made Euro Nymph Leaders are designed with a unique taper to meet the needs of all European nymphing methods for competitors and first-timers.
These 11’ leaders are built out of a high-vis milky white tapered leader which is hand-tied to 22” of their Indicator Tippet material. This gives maximum visibility in all lighting conditions to make subtle strike detection easier.
The leader ends with a tippet ring and requires you to attach your own tippet to properly match the water depth you are fishing.

We have plenty of these leaders in stock and they are great value at only £10.99 each.
Fancy Rolling Your Own Leaders ...
This hi-vis, two-coloured nylon tippet, with colour changes every 8" is ideal for nymphing and indicators.
Opaque two-tone 8” sections of fluorescent pink and fluorescent chartreuse (or Black and White) colour-changing tippet with highly defined hard colour changes. These colour breaks create maximum contrast to allow anglers to get visual cues when tight line nymphing. The best indicator material for building sighters for European Style Nymphing.
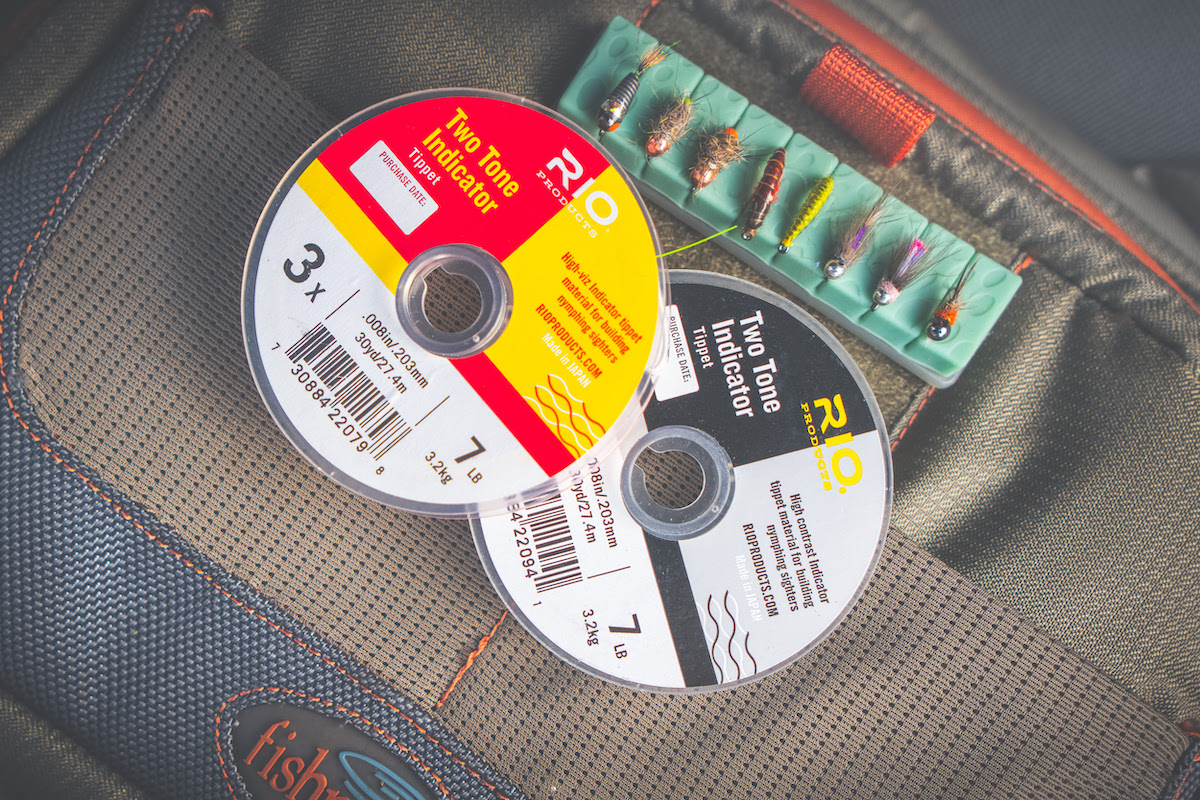
Again, we've stocked up on these so we have plenty of spools available and they are great value at only £15.99 for a 30yd spool - enough to build a lifetimes supply of leaders!
Go on, you know you want to!
As always, if you have any questions or anything to add to any of the above, just get in touch with me by replying to this email.
Tight lines & have fun.


